
doors for schools
How to Choose Commercial Doors and Hardware for a School Project
Choose the assembly by what each school opening must accomplish
A school door package should be selected opening by opening, because each opening may have a different combination of security, free egress, accessibility, fire protection, traffic, appearance, and maintenance demands. Treating every classroom, corridor, stair, service, and exterior opening as the same product decision can leave the door, frame, and hardware working against the project documents.
For a school project in Omaha, Lincoln, Scottsbluff, North Platte, Council Bluffs, Grand Island, David City, Columbus, Aurora, or Lincoln’s Haymarket District, begin with the requirements assigned to each opening rather than with a preferred material or hardware brand. A school renovation may involve existing walls and frames, while new construction may depend on drawings, schedules, specifications, and authority review. The project record controls the selection.
Use six questions to establish the opening’s job:
- What movement must the opening support, including ordinary passage, accessible operation, emergency egress, or controlled entry?
- Does the opening require a fire-rated assembly, and do the door, frame, hardware, and closing and latching functions remain coordinated with that requirement?
- Will the opening experience frequent use, impact, carts, equipment movement, weather exposure, or security pressure?
- Which components belong in the hardware group, including hinges, locks or mortise locks, closers, exit devices, protection plates, stops, seals, or electrified hardware?
- What do the floor plan, door schedule, hardware schedule, and project specifications say about size, type, frame, fire rating, finish, accessibility, and security?
- Which decisions require field verification, formal substitution review, architect approval, a qualified design professional, or authority-having-jurisdiction review?
Add the opening’s release status to that record. A package can be technically detailed and still not be ready for procurement if a wall condition, fire label, hardware function, field dimension, or approval remains unresolved. Mark each item as documented, field-verified, awaiting clarification, or approved through the project’s stated process.
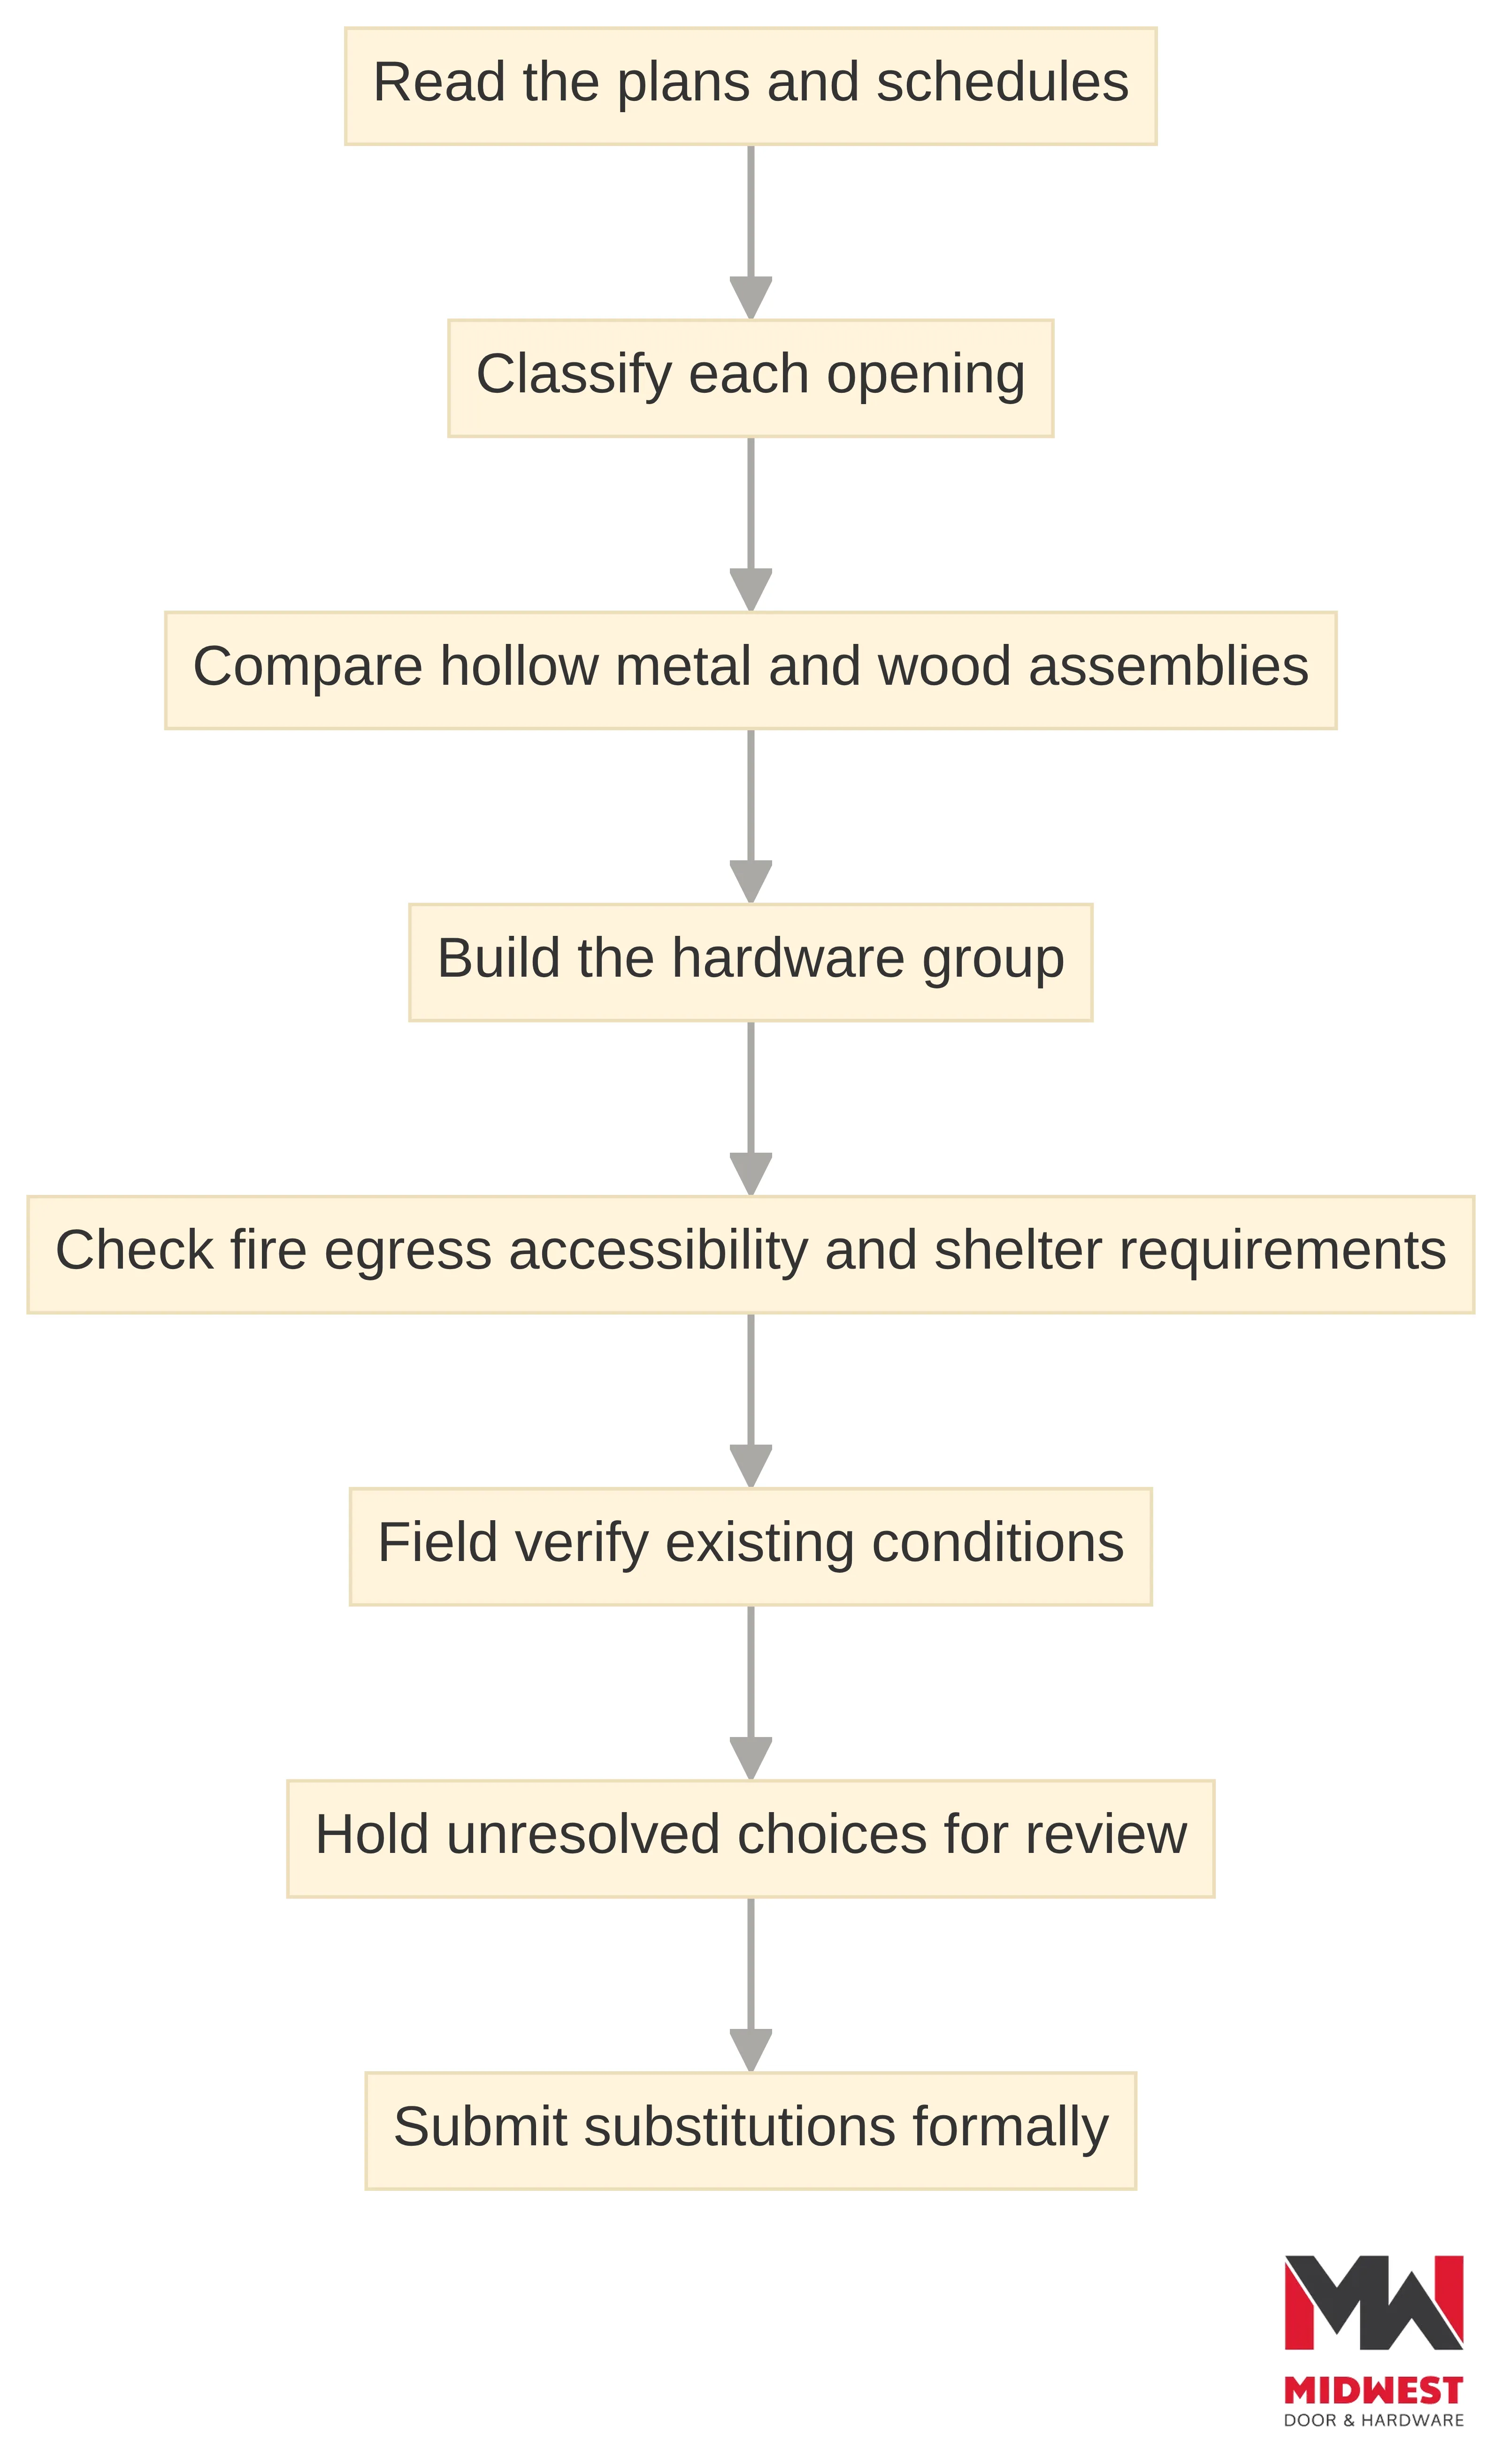
The complete opening is the decision unit. A commercial door opening coordinates hanging, locking, controlling, and protecting functions as one system, and the components should be documented together before ordering or installation. The sections that follow use that principle to compare hollow metal and wood assemblies, coordinate hardware, check life-safety obligations, and hold unresolved choices at the proper approval point.
Compare School Door Materials by Opening Conditions
There is no universal school-door material. Compare hollow-metal and wood assemblies by what each opening must withstand, how it must operate, and what the project documents require. Hollow-metal assemblies may suit areas exposed to frequent use, impact, vandalism, high traffic, fire-rating, or security demands. Wood frames may suit protected interiors where appearance and wood-door coordination take priority. These are application-related trade-offs, not project-specific determinations.
The most useful comparison starts with the opening’s dominant condition. A busy student circulation area, service entrance, stairwell, or security-sensitive opening may place more weight on impact resistance, durability, fire protection, or controlled access. A protected interior opening may place more weight on appearance and coordination with wood doors. Exterior exposure, wall construction, door weight, maintenance expectations, and the required hardware can change the balance. Compare the complete door-and-frame assembly rather than treating the material alone as the answer.
A complete comparison includes the door, frame, hardware, seals, wall type, installation requirements, repair, replacement, and lifecycle cost. Purchase price does not describe the full ownership decision. A material that fits one opening may create different repair or coordination needs in another. The project specifications, approved details, and applicable authority requirements control the final selection.
Hardware is part of that material decision, not a later add-on. Depending on the opening, the package can include hinges, a lockset or mortise lock, a closer, an exit device, a kick plate, a door stop, weather stripping, and electrified components. Select hinges, lock functions, and closers in relation to door weight, traffic level, wall substrate, and fire-rating requirements. When an opening is electrified, power transfer, request-to-exit devices, access-control timing, and mechanical hardware need to work together. The hardware group should reflect the opening’s actual use rather than a generic school-wide assumption.
The floor plan and schedules provide the opening context for that comparison. A door schedule may connect each opening to its mark, size, type, frame reference, hardware group, fire rating, finish, and special accessibility or security remarks. The floor plan locates the opening, while the hardware schedule identifies the components assigned to it. Reading those records together helps show whether the selected material and hardware answer the conditions at that particular location. For existing work, project specifications may also require field verification of openings and measurement of doors before hardware selections are finalized.
Fire-rated openings require the door, frame, and hardware to function as a listed assembly. Use the listed components and maintain self-closing and self-latching operation while preserving accessible, user-friendly operation. NFPA 80 is among the requirements to account for in the installation, inspection, and maintenance of fire-rated door assemblies; the adopted edition and local requirements still need to be established for the project. A material comparison that ignores the rating, frame, closer, latch, or other listed component is incomplete.
School security decisions also have an egress and accessibility side. The project team should keep the controlled-access function, free egress, door handing, opening force, clear width, and accessible hardware in the same discussion. Where the selected 2021 IBC text is adopted, it limits the force to set a power-operated egress door in motion to 50 pounds (220 N); verify the adopted code and project requirements. The adopted code and project requirements determine the applicable decision.
A designated community storm shelter deserves a separate comparison rather than being treated as an ordinary high-traffic opening. The same guidance describes a written responsibility statement from the installer to the authority having jurisdiction and special inspection for post-installed anchors.
Nebraska’s tornado-prone climate can make storm-shelter openings a distinct project question, but location alone does not determine a rating, product, or hardware choice. That principle applies to school work in Omaha, Scottsbluff, Lincoln, North Platte, Council Bluffs, Grand Island, David City, Columbus, Aurora, and Lincoln’s Haymarket District. The adopted requirements, project specifications, designated shelter status, and authority review remain the controlling context.
Maintenance belongs in the material comparison from the beginning. Consider how the opening will be inspected, adjusted, repaired, and replaced over time. Annual preventative maintenance programs support recurring review of door operation, hardware condition, and fire-rated assembly requirements. For protected wood-door interiors, Midwest Door & Hardware’s cosmetic wood door repair service can be evaluated as a cost-effective alternative to replacement when the project permits repair. Repair, maintenance, and replacement decisions still depend on the opening condition and project requirements.
Formal review matters when the documents do not resolve the choice. A proposed alternate should explain why the specified product cannot be provided, identify coordination changes, compare significant qualities, and include the required product data and supporting documentation. Products that are not specified or approved as alternates should not be changed in the field without the applicable substitution process and architect approval. A qualified design professional, code authority, school-district security coordinator, or commercial door and hardware specialist can address project-specific questions that remain after the documents are read.
Midwest Door & Hardware offers frames, doors, hardware, and expertise for building projects, along with installation and adjustment services, annual preventative maintenance, keying solutions, and cosmetic wood door repair. That scope can support a project team comparing school opening options, while the design professional, contract documents, and applicable authorities retain responsibility for project-specific design and approval decisions.
Map the obligations before choosing wood or hollow metal
A school door and frame comparison should begin with the obligations attached to the opening, not with a material preference.
The material comparison below is a starting framework, not a project-specific determination. The project documents, adopted requirements, wall condition, and approved details control.
| Shared criterion | Hollow metal assembly | Wood assembly |
|---|---|---|
| Traffic and impact | May fit areas exposed to frequent use, impact, or vandalism. | May fit a protected interior where impact resistance is not the leading condition. |
| Fire-rated or security-sensitive use | Hollow-metal frames may fit high-traffic, fire-rated, or security-sensitive openings. | Do not select by appearance alone; confirm the complete approved assembly and its requirements. |
| Appearance and wood coordination | May place less emphasis on a wood-door appearance where the documents permit another finish. | May fit protected interiors where appearance and coordination with wood doors take priority. |
| Complete system review | Compare the door, frame, hardware, seals, wall type, installation, repair, and replacement together. | Apply the same complete-assembly review rather than comparing frame material alone. |
| Release condition | Confirm fire ratings, anchors, finishes, and other requirements before ordering. | Confirm the same project-specific requirements before ordering. |
The cited commercial construction guidance describes hollow-metal assemblies as potentially suitable for demanding school environments exposed to frequent use, impact, or vandalism. Separate guidance describes hollow-metal frames as potentially advantageous for high-traffic, fire-rated, or security-sensitive openings, while wood frames may suit protected interiors where appearance and wood-door coordination take priority.
Use the comparison to identify questions, not to approve a product. For each opening, record the wall type, expected traffic, exposure, security function, fire-rating requirement, accessibility notes, finish, door type, frame type, hardware group, and any special remarks shown in the schedule.
Separate the decision into three categories before discussing products:
- Documented requirements: Items shown in the drawings, schedules, specifications, approved details, or governing project instructions.
- Observed conditions: Existing dimensions, wall construction, labels, hardware preparations, damage, and other field information.
- Open decisions: Conflicts, missing information, proposed alternates, and conditions requiring design or authority review.
This separation prevents a general material tendency from being mistaken for an approved project requirement. It also gives your team a clear reason for every hold point.
The choice between wood and hollow metal is therefore conditional. If frequent impact, a security-sensitive location, or a high-traffic condition controls the opening, hollow metal may warrant closer consideration. If the opening is a protected interior and appearance or wood-door coordination controls, a wood assembly may warrant consideration. If the documents do not settle the question, preserve the unresolved choice for formal project review rather than converting a general material tendency into an approval.
Use hollow metal where the opening demands resistance
Hollow metal may fit a school opening when frequent use, impact, vandalism, high traffic, fire-rating needs, or security sensitivity places more pressure on the assembly. The cited guidance describes hollow-metal assemblies as suitable for demanding school environments subject to frequent use, impact, or vandalism, while separate guidance identifies hollow-metal frames as a possible fit for high-traffic, fire-rated, or security-sensitive commercial openings.
That description does not approve hollow metal for every school opening. Confirm the door type, frame type, wall condition, hardware group, fire rating, finish, and special remarks in the project record. A hollow-metal frame still has to coordinate with the wall and with the door and hardware selected for the opening.
Use a hollow-metal review when your opening record raises questions such as:
- Will the opening experience repeated passage, carts, equipment, or contact that makes impact resistance a project concern?
- Is the opening part of a fire-rated or security-sensitive condition that requires a coordinated listed assembly?
- Does the frame type match the wall construction and installation details shown in the documents?
- Can the hinges, lock or mortise lock, closer, exit device, protection plate, stop, seals, and any electrified components operate with the selected door and frame?
- Does the finish requirement apply to both the door and frame, and is it recorded in the schedule or specifications?
Compare the complete door-and-frame assembly, hardware, seals, wall type, installation, repair, replacement, and lifecycle cost rather than frame material or purchase price alone. If the opening record supports hollow metal but leaves a rating, wall, hardware, or approval question unresolved, mark the item for coordination before release. A material that appears to resist the expected conditions is not a substitute for a complete approved assembly.
Review the frame interface before treating the door selection as complete. Confirm the wall construction, frame anchoring information, clearances, hardware preparations, and adjacent finishes shown in the project documents. A durable door paired with an unresolved frame or wall condition still creates an installation risk. Release the hollow-metal direction only when the complete assembly and its interfaces are documented.
Use wood where protected interiors and appearance lead
Wood may fit a protected interior school opening when appearance and coordination with wood doors take priority over the impact resistance associated with more demanding locations. The cited comparison describes wood frames as potentially suitable for protected interiors where appearance and wood-door coordination matter more than impact resistance.
A wood selection still begins with the opening record. Check the door type, frame type, hardware group, fire-rating field, finish, accessibility notes, security notes, and wall condition before treating appearance as the deciding factor. A schedule may connect those requirements to the opening mark and location, giving you a common record for coordination.
Use a wood-assembly review when the opening record raises questions such as:
- Is the location protected from the impact and traffic conditions that may favor hollow metal?
- Does the specified appearance require coordination with a wood door, frame, finish, or surrounding architectural work?
- Does the assembly have a fire-rating, accessibility, security, or hardware requirement that changes the selection?
- Will the complete frame, door, hardware, seals, and wall condition work together after installation?
- Can the opening be maintained and repaired within the project’s intended use and approval requirements?
Do not treat wood as the appearance-only option or hollow metal as the durability-only answer. The complete assembly, including hardware and seals, should be compared against the wall type, installation, repair, replacement, and lifecycle considerations.
If the documents identify a protected interior and support a wood assembly, carry that choice through the door schedule and hardware coordination. If the opening also carries a fire, security, accessibility, or unusual traffic requirement, stop the material decision until the applicable project documents and authority review settle the condition. The direct action is to document the reason for the selection and the requirements that still need approval.
A wood decision also deserves a maintenance discussion before release. Identify the areas where the opening may receive repeated contact, cleaning, equipment movement, or hardware adjustment, then compare those conditions with the approved door, frame, finish, and protection details. If the project record does not establish how those conditions are handled, keep the selection open rather than treating appearance as sufficient justification.
Coordinate the hardware package with the opening’s real demands
The opening’s documented function and conditions provide the starting point for compatible hardware selection.
Select hinges, lock functions, and closers based on the door’s weight, traffic level, wall substrate, and fire-rating requirements. Use that principle to test the hardware group against the actual opening record:
- Hanging: Confirm the hinge requirement against the door weight, size, traffic, frame preparation, and handing shown in the documents. Do not release a hardware group that leaves the door and frame preparation unresolved.
- Locking: Confirm whether the opening calls for a lockset, mortise lock, exit device, panic device, or another specified function. Match the function to the project’s security, egress, and access requirements rather than choosing from a generic classroom assumption.
- Closing: Confirm the closer type and adjustment requirements against door weight, traffic, fire-rated conditions, and accessible operation. A fire-rated opening must maintain self-closing operation where the applicable requirements call for it.
- Protecting: Account for kick plates, stops, weather stripping, and other protection or sealing components where the opening record requires them. Check clearances and adjacent construction before ordering.
- Electrification: When an opening is electrified, coordinate power transfer, request-to-exit devices, access-control timing, and mechanical hardware early. Record the power, control, and mechanical interfaces together so the access-control portion does not conflict with the door’s ordinary operation.
- Egress and accessibility: Keep the hardware group consistent with the applicable egress and accessibility requirements. The selected school-security guidance identifies NFPA 101, the IBC, ICC A117.1, and the ADA Standards as potential governing references, with applicability dependent on adopted requirements and project conditions.
Handing deserves its own check because it affects the relationship between the plan, frame preparation, lock function, closer, exit device, and user movement. Record the handing shown in the documents, compare it with field conditions where applicable, and route any conflict for clarification. Do not correct a handing discrepancy by reversing a hardware group informally.
Power-operated means-of-egress doors require a separate code check. Under the selected 2021 IBC text, a power-operated egress door must permit manual opening during power failure, and the force to set it in motion must not exceed 50 pounds (220 N); verify the adopted code and amendments before applying that provision to your project.
Use the hardware schedule as the controlling coordination record, then compare it with the floor plan and door schedule. If the hardware group does not match the door type, frame preparation, access-control intent, fire-rating requirement, or accessibility notes, hold the opening for clarification. Do not solve an unresolved interface by selecting a convenient field component.
Before release, identify who will install, adjust, connect, and inspect each hardware interface. The opening record should make clear whether a mechanical, electrical, access-control, or door-and-frame coordination question remains. That clarity helps keep a hardware omission from appearing later as an installation problem.
Resolve fire-rated assemblies as complete systems
A fire-rated school opening must be coordinated as a complete assembly of door, frame, hardware, closing, latching, and related construction conditions. The selected commercial-door guidance recommends using listed components for fire-rated openings and maintaining self-closing and self-latching operation while preserving accessible, user-friendly operation.
The selected school-security guidance identifies NFPA 80 as governing installation, inspection, and maintenance of fire-rated door assemblies in schools, while also directing you to confirm the adopted edition and local requirements. Use the project specifications, adopted code, labeled assembly information, and authority review together. Do not infer a rating from the door material, a frame appearance, or a hardware item considered by itself.
Resolve the fire-rated opening in this order:
- Locate the opening and its fire-rating field in the door schedule.
- Confirm the door type, frame type, wall construction, and labeled assembly information required by the documents.
- Match the hardware group to the door and frame, including hinges, lock or exit functions, closer, and latching components.
- Check that the selected components are listed for the required assembly and that self-closing and self-latching operation remain available where required.
- Examine existing or prepared openings for conditions that could affect the labeled assembly, including tolerances, wall and floor construction, and installation conditions.
- Hold discrepancies for the architect, qualified design professional, authority having jurisdiction, or other required project reviewer.
A selected school replacement specification required examination of doors and frames before ordering and installation for installation tolerances, labeled fire-rated assembly construction, wall and floor construction, and other conditions affecting performance. That requirement belonged to the selected Worcester, Massachusetts project, so treat it as a useful coordination example rather than a universal contract term. Your project specifications control.
A fire-rating field that is blank, unclear, or inconsistent with the hardware group is a release boundary. Do not order a different closer, lock function, frame, or door and assume the rating remains intact. Resolve the assembly as a documented system before fabrication, procurement, or installation.
For existing school work, photograph or record the visible label and surrounding conditions according to the project’s documentation process. Compare that information with the scheduled rating and approved assembly details. If the label cannot be read, the wall condition is uncertain, or the replacement component is not established as compatible, route the opening for review instead of assigning a rating from appearance.
Protect egress and accessibility when security is added
School security hardware must remain coordinated with egress and accessibility requirements.
Start with the operation required from each side of the opening. Record the direction of travel, door handing, lock function, exit device or panic-device requirement, closer, access-control interface, and accessibility notes. Then compare those items with the floor plan, door schedule, hardware schedule, and project specifications. Security intent does not replace the need to coordinate ordinary operation, accessible use, and emergency egress.
Use this security-and-egress check before releasing hardware:
- Identify the side from which egress must occur and the hardware function assigned to that movement.
- Confirm that the selected lock or exit device does not conflict with the specified egress arrangement.
- Check accessible hardware, opening force, clear width, and operating conditions against the adopted requirements and project details.
- Coordinate electrified hardware, power transfer, request-to-exit devices, access-control timing, and mechanical hardware before ordering.
- If the door is power-operated and serves means of egress, verify the adopted code. – Send any conflict between security intent and egress or accessibility to the architect, qualified design professional, school district security coordinator, or AHJ as the project requires.
Do not make a project-specific compliance determination from a generic classroom hardware description. Your direct action is to keep unresolved security, egress, and accessibility functions out of the release package until the responsible project authority resolves them.
Check the complete operating sequence, not only the locked position. Consider entry, exit, authorized access, power loss, ordinary passage, and the relationship between mechanical and electrified hardware as separate coordination questions. If the sequence is not clear in the approved documents, record the uncertainty and route it to the responsible reviewer.
Treat tornado-shelter openings as a separate approval path
A designated community storm-shelter opening should be handled through its ICC 500 approval path rather than through an ordinary school-door selection.
For a Nebraska school project in Omaha, Lincoln, Scottsbluff, North Platte, Grand Island, David City, Columbus, Aurora, or another community, first establish whether the opening is part of a designated community storm shelter. Do not assume that a room described informally as a shelter carries the same project status. The construction documents, design professional, owner, and AHJ must establish the applicable classification and requirements.
Once the opening is identified as a designated storm-shelter opening, keep these controls visible in the package:
- Use the ICC 500 requirements identified for the project and do not replace the specified or approved door and hardware assembly with an unreviewed equivalent.
- Keep interior egress compatibility in the hardware review. – Coordinate anchors and installation details with the approved design and inspection requirements. FEMA’s selected guidance states that post-installed anchors require special inspection to verify compliance with the required design information.
- Account for the installer’s responsibility statement. The same guidance states that contractors installing community storm-shelter door or shutter assemblies must submit a written responsibility statement to the AHJ.
- Keep substitutions within the formal project process. Midwest Door & Hardware does not treat an unspecified or unapproved alternate as a field substitution; formal substitution review and architect approval are required.
The storm-shelter branch ends at approval, not at product preference. If the listed assembly, interior egress function, anchor detail, installer responsibility, or AHJ submission is unresolved, hold the opening and route it to the responsible design and approval team.
Keep shelter openings visibly separate in your opening register. Their assembly listings, anchor inspections, installer responsibilities, and approval status should not be buried among ordinary classroom or corridor openings. That distinction helps the project team apply the more specific review path before procurement or installation.
Use the floor plan and schedules to test every opening choice
The floor plan, door schedule, and hardware schedule should be read as one coordination set. A common field workflow is to check all three so hardware is installed correctly.
Use the opening mark as the common identifier, then test each record against the others. This creates a practical coordination pass without turning the schedule into a substitute for the project specifications or authority review.
Start with the floor plan
Locate the opening and identify the room, corridor, stair, exterior edge, service area, or other space shown in the documents. Check the swing, adjacent walls, clearances, pairs, sidelights, equipment paths, and the relationship to nearby openings. Confirm that the opening shown on the plan matches the opening mark carried into the door schedule.
The floor plan gives the opening context. It may also expose conflicts that a schedule row cannot show by itself, such as a door swing toward equipment, a closer interfering with adjacent construction, or an access-control device needing coordination with another system. Record the conflict; do not resolve it by changing the hardware group without approval.
Read the door schedule row
Use the schedule to confirm the door mark, finish, and special remarks, then compare the row with the project documents. Compare the row with the material decision:
- Does the listed door type support the selected wood or hollow-metal direction?
- Does the frame type match the wall construction and installation detail?
- Is the fire-rating field consistent with the complete assembly and hardware group?
- Do the accessibility, security, sound, glazing, or other remarks carry into the hardware and submittal package?
- Does the finish apply to the door, frame, and hardware as the documents require?
A blank or conflicting schedule field is a coordination item. It is not permission to select a standard product by assumption.
Open the hardware schedule
Match the hardware group to the door mark and list the actual components. Midwest Door & Hardware’s commercial opening guidance identifies hinges, a lockset or mortise lock, a door closer, a panic device or crash bar, a kick plate, a door stop, and weather stripping as possible components of one opening. Midwest Door & Hardware also provides hinges, locks, exit devices, closers, and electrified hardware.
Check whether the hardware group accounts for the opening’s weight, traffic, wall substrate, fire-rating requirements, egress, accessibility, and security. The commercial-door guidance recommends selecting hinges, lock functions, and closers against those conditions. If electrification is present, check power transfer, request-to-exit devices, access-control timing, and mechanical hardware together.
Build a conflict list
For each opening, record the question rather than silently editing one document to match another:
- Floor-plan location does not match the schedule mark.
- Door size or handing does not match the plan or frame detail.
- Frame type conflicts with the wall condition.
- Hardware group omits a component shown in the opening requirements.
- Fire rating does not match the door, frame, or hardware information.
- Security function conflicts with egress or accessible operation.
- Electrified hardware lacks a coordinated power or control detail.
- Finish, protection, weather stripping, or stop requirements are unclear.
Create one coordination record for each opening with these fields:
- Opening mark and plan location.
- Door and frame type, size, material direction, and finish.
- Hardware group and operating function.
- Fire, accessibility, egress, security, and shelter requirements.
- Field condition or document conflict.
- Responsible reviewer, required approval, and release status.
The result should be a traceable opening record: plan location, scheduled assembly, hardware group, applicable requirements, field questions, and approval status. Release the opening only when the records agree or the remaining differences have a documented project decision.
Verify field conditions before release
Existing school openings should be field-verified before you finalize replacement doors, frames, or hardware. The selected Worcester school specifications required field verification of existing openings and field measurement of doors for hardware-selection accuracy. The same selected project required examining openings before ordering and installation for tolerances, labeled fire-rated construction, wall and floor conditions, and other conditions affecting performance.
Those requirements belonged to a selected Massachusetts project, so they do not automatically become a term of your Nebraska or other United States project. They do provide a disciplined field-check model. Use the governing contract, drawings, specifications, and approved procedures for your project.
Record field conditions that can change the opening package:
- Actual width, height, thickness, and clear opening.
- Existing door, frame, wall, floor, anchors, and fastener conditions.
- Handing, swing, pair relationship, and adjacent clearance.
- Existing hinge, lock, closer, exit-device, protection, stop, and seal preparations.
- Fire labels or other assembly information visible on the existing opening.
- Damage, corrosion, distortion, loose components, or conditions affecting operation.
- Existing power, access-control, request-to-exit, and mechanical-hardware interfaces.
- Differences between the measured opening, floor plan, door schedule, and hardware schedule.
Compare the measurement with the scheduled opening before requesting a price or finalizing hardware. A small-looking difference can affect the frame, clear opening, handing, strike location, closer position, exit-device preparation, or access-control interface. Record the difference with the opening mark and identify whether it requires clarification, a revised detail, or an approved change.
Field measurement does not authorize a change to the approved design. It gives you the information needed to identify a conflict before ordering. If the measured condition differs from the schedule, mark the opening for project review and carry the difference into the submittal or clarification process. If a fire-rated label, wall condition, hardware preparation, or clear opening cannot be established, stop the release until the responsible project authority resolves it.
Hold unresolved selections for formal review
Unresolved school-opening selections should remain at a review gate until the responsible project authority settles them. Involve the architect or qualified design professional when the door, frame, hardware, fire-rating, accessibility, security, storm-shelter, wall, or installation condition is not established by the project record. Involve the AHJ or school district security coordinator when the applicable security, egress, fire, accessibility, or local requirement needs authority confirmation. The selected school-security guidance directs you to confirm governing requirements with the AHJ and school district security coordinator.
Use a review note that identifies the opening and the unresolved decision:
- Opening mark and plan location.
- Door and frame selection under consideration.
- Hardware group and operating function.
- Fire, egress, accessibility, security, or storm-shelter issue.
- Field condition or document conflict.
- Decision needed and the party responsible for it.
- Submittal, approval, inspection, or schedule effect.
Assign the review to the party who has authority over the unresolved item. A contractor can document a field conflict and propose coordination information, but the architect, design professional, owner, school district, or AHJ may control the decision depending on the issue and contract. Do not describe an open question as approved merely because a product appears workable.
Storm-shelter openings require additional discipline. FEMA’s selected guidance states that ICC 500-2023 community storm-shelter documents include a registered-design-professional quality assurance plan with detailed door and shutter assembly requirements.
A selected school project also required an owner-approved door and hardware schedule and product-submittal approval before ordering. That was a project-specific requirement, so your contract controls, but it illustrates why an unresolved opening should not move directly from a field conversation to procurement.
The action at this boundary is simple: document the question, identify the responsible reviewer, and hold the affected opening until the project record contains an approved answer.
Control substitutions before they reach the field
A product substitution should move through the project’s formal approval process before it reaches the field.
A selected substitution procedure identifies the information a request should document: why the specified product cannot be provided, coordination changes, a comparison of significant qualities, product data, and other requested supporting material.
Prepare the request around the affected opening and assembly:
- Identify the specified door, frame, hardware, or complete opening and cite the drawing, schedule, and specification location.
- Explain why the specified product cannot be provided, if that is the reason for the request.
- Identify changes to the door, frame, wall, hardware, electrical, access-control, installation, or maintenance coordination.
- Compare the proposed and specified products on the qualities that matter to the project, including performance, size, weight, durability, appearance, features, and stated requirements.
- Include product data, drawings, fabrication information, installation information, samples, test information, and other documents required by the project.
- Route the request through the architect, owner, design professional, or other stated approval process before ordering or installing the proposed product.
The substitution review should cover the full opening, not only the item being changed. A different closer can affect operation and fire-rated performance. A different lock or exit device can affect egress, accessibility, security, power, and preparation. A different frame can affect wall coordination, anchors, clearances, and the door selected for it. Compare the system consequences and document them.
Do not make a field substitution because the proposed product appears similar, is available at the time, or fits a nearby opening. If the documents do not identify the product as specified or approved, hold it for formal review. The approved response, not an informal field assumption, determines whether the proposed component can proceed.
When a proposed alternate affects several openings, identify every affected mark rather than submitting one example and assuming the result carries across the project. Note changes to schedules, details, hardware groups, installation procedures, inspection requirements, and maintenance information. A complete request lets the approval team evaluate the proposed change as part of the opening system.
Key Highlights
A school opening package is ready for the next project step when you can answer these release questions for every opening:
- Function: What must the opening accomplish for passage, egress, accessibility, security, fire protection, traffic, appearance, and maintenance?
- Material: Do the documented conditions support hollow metal, wood, or another approved assembly? Hollow metal may fit demanding or security-sensitive conditions, while wood may fit a protected interior where appearance and wood-door coordination lead. Compare the complete assembly.
- Hardware: Do hinges, locks or mortise locks, exit devices, closers, kick plates, stops, weather stripping, and electrified hardware match the opening’s real demands?
- Life safety: Are the applicable fire, egress, accessibility, and local requirements identified, and are listed components and required closing and latching functions coordinated?
- Shelter: If the opening serves a designated community storm shelter, do the construction documents address the ICC 500 quality assurance plan and detailed door and shutter assembly requirements, along with installer responsibility and special inspection for post-installed anchors?
- Records: Do the floor plan, door schedule, and hardware schedule agree on the opening mark, size, type, frame, hardware group, fire rating, finish, accessibility, and security notes?
- Field conditions: Have existing openings been verified and measured where the project requires it, including conditions affecting labeled assemblies and hardware selection?
- Approvals: Are unresolved selections held for the architect, design professional, owner, school district, or AHJ, and are substitutions documented before procurement or installation?
Add one final question: can another project participant understand why the opening was selected and what remains before release? If the answer depends on an informal conversation, a missing field measurement, or an unapproved alternate, the package is still at a review gate.
For a school project in Nebraska or the surrounding regional market, this checklist gives your team a common record to discuss across estimating, procurement, installation, inspection, and owner coordination. Use it to identify the next decision, not to bypass the project’s governing documents.
Release a coordinated school opening package
A coordinated school opening package connects each opening’s function to its door, frame, hardware, schedule record, field condition, and approval status. The practical release point is not a preferred material or a familiar hardware group; it is a documented assembly whose fire, egress, accessibility, security, durability, maintenance, and installation questions have been addressed at the proper project level.
Midwest Door & Hardware offers frames, doors, hardware, and expertise for building projects, including commercial hardware such as hinges, locks, exit devices, closers, and electrified hardware. For project-specific school openings, gather the relevant plans, schedules, specifications, field measurements, hardware groups, unresolved questions, and approval status so the next discussion can focus on the actual conditions. Qualified design professionals and the authority having jurisdiction decide individual project suitability and compliance where those determinations are required.
What should be confirmed before a school door package is ordered?
What are the key considerations when selecting commercial doors for a school project?
When selecting commercial doors for a school project, consider the specific requirements for each opening, including security, egress, accessibility, fire protection, traffic levels, and maintenance needs. Each opening may have different demands, so it’s essential to evaluate them individually rather than applying a one-size-fits-all approach.
How should I coordinate the hardware package with the door openings?
The hardware package should be selected as part of the overall opening design. Ensure that hinges, locks, exit devices, closers, and other components are matched to the door’s weight, traffic level, wall substrate, and fire-rating requirements. Coordination is crucial to ensure proper functionality and compliance with safety standards.
What is the process for handling product substitutions in school projects?
Product substitutions must go through a formal approval process before being implemented in the field. This includes documenting the reason for the substitution, any coordination changes, and a comparison of the proposed product’s qualities against the specified product. Approval from the architect or design professional is required.
How do I verify existing conditions before finalizing door selections?
Before finalizing door selections, existing conditions should be field-verified. This includes measuring the actual dimensions of openings, checking for any damage or discrepancies, and ensuring that the existing hardware and wall conditions align with the project specifications.
What should I do if there are unresolved selections for a school opening?
Unresolved selections should be held for formal review until the responsible project authority settles them. This may involve consulting with the architect, design professional, or authority having jurisdiction to confirm compliance with applicable codes and project requirements.
Start Your Build
Got a project? We'll bring frames, doors, hardware, and the expertise to keep every opening on schedule.